
Are you in desperate need of sending large image as attachments in Outlook 2013? If yes, here is a trick to help you resize your image into smaller size. This will allow you to send the picture more quickly and help you avoid company attachment size limits. Resizing the image will prevent you from getting bounce backs. So, the next time you want to resize an image for yourself, this is what you should do:
This is a quick method of resizing images but you should note that it will only allow you to resize them to a resolution of 1024 x 768 pixels. This will not give you the ultimate full quality of a RAW image but it can still be useful in a lot of situations.
Open Outlook and compose a new message
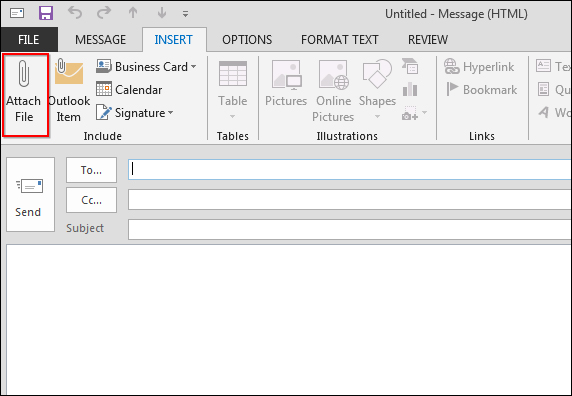
Click on the Insert tab on the Ribbon and hit Attach File
Find the image you want to resize and attach to the message

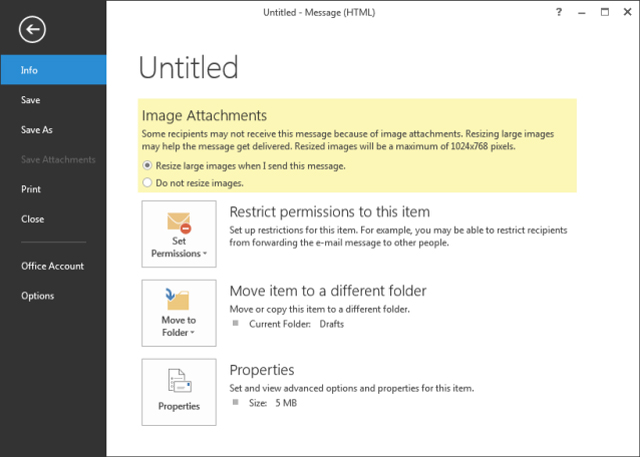
Once the image has been added as an attachment, click the File tab.

The following screen will appear in the Info section. Select “Resize large images when I send this message” and click the arrow on the top right side to return to the Compose screen. Type your message and send it off.
If you want to resize the image for yourself, type your own email address and send it to yourself. You may later open the message from the Inbox or from Sent Items.
Once you open the message, you will notice that the image attachment is significantly smaller in size. Right-click the name of the file and Save it wherever you want on your PC.

If you need to send the original large RAW photo, use Dropbox, SkyDrive, or service like YouSentIt.

Akshay Agarwal
Latest posts by Akshay Agarwal (see all)
- Indian Funky Nightwear Brand for Babies and Kids Online - November 11, 2020
- Children’s Boutique Clothing Manufacturers in India - September 25, 2020
- Kids Celebrity Designer – Aastha Agarwal to showcase her collection at India Kids Fashion Week in Jaipur - September 7, 2019